Showing posts with label home improvements. Show all posts

Monday, July 2, 2018

Kitchen Island - June 2017

When I sold our massive china cabinet last summer, I knew I wanted to replace it with something much smaller, but struggled to find exactly what I wanted and needed without spending hundreds of dollars. 

Before
Honey suggested an island that his work was no longer using after their remodel, and the dimensions were perfect!   It was somewhere in one of their seven storage units and they said if we could locate it, we could have it.  We were fortunate to find it in the second unit, but it was in the VERY back of the large unit.  We spent an hour moving boxes of documents and office chairs and desk and there it was... A tad bit of water damage on the top, but that was okay.
Water damage

It was so heavy that we had to put it on a small furniture dolly we have, so I could move it around.  Some of the gems we discovered was a piece on the back that would extend out an additional 27" if it had the piece attached.  We thought it would fit just right into our kitchen style and the spot we needed it to go. Turns out it was worth over $1,000, but we got it for free!  I love a great bargain! 
back extension

First thing was adding knobs so I could access the draws as I started on the make-over.  I started with a coat of regular teal wall paint to match our kitchen cabinets, added a little burnt umber to antique, and finished with some white to transform it to it's new version. 

The top was a bit more tricky as it was glossy.  A little sandpaper to rough it up did the trick and painted it white.  Honey liked the natural wood look for the top at first, but he eventually, he concluded, the painted version was great. i added a little burnt umber to highlight and add details to the top, and now it looks like it's always been distressed. 


The back
My adorable new helper


I must have missed a spot


The final version


 We decided it was time to move some pieces around to make everything look better and give us more space, and we were very pleased with the final look.

Thursday, July 13, 2017

Daycare Cubby Storage

Add caption
It was getting out of hand and my frustration was growing.  Toys.  Because I own and run my daycare business from my home, the kids live here daily and they come to feel that it's their home as well, which I love.  The big issue is dealing with the things I need daily to use for my daycare.  Things are stashed here and there.  Mats, cribs and blankets in the spare room, puzzles and kitchen type toys in the hall bench, but the majority of items occupy a space in our living room, or Playroom as the kids refer to it as.

The Bin system I found at a yard sale years ago was not really working and the space was not being utilized very well, but alternatives were expensive to purchase and they were not made of real wood. I got some inspiration after seeing a cubby system that Honey's nephew had built for their home, and began researching.  After talking to Honey about it, he told me to draw out what I was thinking and he would take it from there.  He's a keeper!  He quickly drew up the plans and confirmed that is what I needed and off to Lowes for a date night we went.  Are we the only ones who spend a date at a home improvement store?  We spent one Saturday morning building the Cubbies with really nice quality pine and I'm so happy with the results.  
Hand sanding
As Honey cut the boards, I began hand sanding with a block sander because Honey couldn't find his palm sander.  It was a ton of work, but we are both pleased. The boards were almost as smooth as a baby's bottom!


There are two sets of cubbies: Set one  has six storage spaces and Set Two as four normal spaces and two double spaces.  The double space will allow for a hidden space in the corner.

I was able to find fabric baskets at Target just the size and price I needed.  I looked at Amazon, but was wary of the thin fabric that so many seemed to be made of. After going through, sorting, getting rid of some, and putting other toys in plastic and fabric bins, I still have organizing and rearranging to do, but I'm pretty pleased with the results. I love that I have such a wonderful space now to store and organize toys, puzzles, and things I use for daycare, but I LOVE the nice flat top surface to place those bulky toys that won't fit in the baskets or plastic bins. I originally planned to paint it, but I'm not sure if I'll do that now.  Running out of time and steam for completing projects this summer.
Set two
Set one


Told you it was a mess of toys! 


without backs so you can see the hidden space


Adding backs to each cubby cabinet


Finally finished  

Sunday, June 11, 2017

Magic little word of purging

It all started with nine little words: "I'm having a garage sale, want to join me?"

Honestly, I've wanted to have one for so long.  I feel like I live in clutter, and it really does bother me.  Some of the clutter has come from 27 years of marriage, three kids, two parents passing away and acquiring some of their belongings, and having an in-home daycare. I was pretty giddy when Honey suggested we work on cleaning out the garage.  So we only cleaned out 1/3 of the garage, but it's a start!

When the garage sale came up, I was so excited!  I'd not had one since the kids were little and there was so much I wanted to purge.  First was the antique china cabinet and former front storm door sold, then we wanted to get rid of our Big comfy Couch.  We attempted to list it on a local on-line garage sale, but we found that people want to low ball, no matter what something is really worth.  Something for nothing.  Grrrr...  It didn't sell at the garage sale, even though we had a live model sleeping on it.  Eventually it did sell and we were beyond excited.  We were so tired of hauling that thing back and forth.

What I did love was the openness that we suddenly had in the living room.  We have been longing to replace the old massive entertainment center we purchased over 25 years ago.  I knew we wouldn't be able to re-sell it, so re-purposing was perfect. Some of it became a new storage center in the now empty bedroom after Oldest moved out of state.  It still needs to have a cap put on the top, but I'm pretty happy.  I may use another portion to make another storage bookcase if needed.
Original
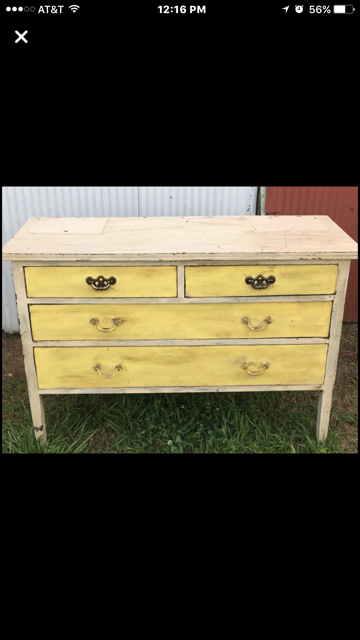
The search began for a new entertainment center and we wanted to go small.  We are working towards the empty nest and paring things down.  It's really kinda exciting!  I found a cute antique dresser for $50.  I can't figure out why someone would paint over the beautiful pulls, but after cleaning up the beautiful handles, Honey reconfigured the drawers, and drilled two holes in the back for cord access. I repainted and distressed it, before setting it up.  We're quite pleased with the final look!


Hidden beauty

We have since purchased brand new couch and recliner, and filled up that wonderful open space we made. My mom's piano now occupies part of one wall, and a major tuning needs to happen, but I am really looking forward to playing it once again. I plan to purge the daycare toy area, getting rid of needless toys, and hang some pictures before I'll be finished, but it's a start!


Now if I could only get the spare bedroom cleaned out!!!!  Guess we need to hold another garage sale!
Updated


Tuesday, June 28, 2016

Update to a Privy

Before
I've been itching to update the front bathroom (aka Kids' bathroom). Oldest had painted it many years ago and it looked like a teenage boy had painted it with a lack of finesse.  The week of my  hand surgery, I knew it was my only chance this summer. Our boys were at church camp, and Honey was spending a lot of time at work,  due to having to move to a different building before renovations begin.  I didn't tell them I was going to work on the bathroom, and since Honey never uses that bathroom, he had no idea!
removing backsplash
Monday, I began by ripping off an ugly wood shelf backspash trim (note the white spot) and brainstorming how to proceed.  Yes, I was going forward with no real concrete plan and leftover paint.  I wanted the walls to be an off white to lighten it up, but only had two cans of brown and white.  Mixed some brown to the white to achieve the cream I desired and painted away.  Next, was the issue of the ugly white space the back splash left, and with the leftover tile from our Kitchen reno, I decided to use it there.  I was a bit nervous at doing some tiling by myself, but knew Honey didn't have time, so I dove right in. It wasn't as hard as I thought it would be... 

 Of course, I still had Little K coming that week, so I worked between naps and downtime.  Sometimes he would play in the doorway as I worked.  As long as he was chattering away and playing in my sight, he was one happy kid.  His puppy, who comes with him (we absolutely love her), decided she needed to be in the middle of it as well. 
Little K
Hazel, the pup
There was a hole in the wall that Honey made to gain access to fix the water heater.  Spent three days spackeling and making that as smooth as possible.  That was hard for me, and Little K kept asking why I was putting pink stuff on the wall. 
   
Fixing a mess

a bit distressing
New pulls and knobs
Knowing the bathroom cabinets, trim, and door needed to be repainted, I mixed some of the white paint with the brown to achieve the right color, painted them and distressed them.  It takes no time at all and is really a bit of fun for me.  Just hope I got it right!  Only and I picked out drawer pulls and cabinet handles at Hobby Lobby on Monday, and hope to talk Honey into drilling the holes for me, since I can't lift over two pounds yet with my right hand. Shoot, I can't even brush my teeth with that hand yet! I'll update a picture once that is done.  Well, I attempted to find Honey's drill in the eh hem garage, but got frustrated with Honey's "keeper" side.  After a trip to the Farmer's Market for some fresh corn and potatoes from Crabtree Farms, we swung Lowes and I bought my own drill to keep in the house.  I'm pretty happy with my purchase and it was so easy to use.


Noticed when I was painting the walls, that the previous owner did NOT nail the trim boards on well and they easily came off.  Made for painting easier.  Now to ask Honey to add some nice trim that isn't so cheap and bulky.   It seems that Honey's Do List is growing steadily. 


framed Medicine cabinet


Last, I added an accent color to the mirror by using some of the left over paint from the kitchen reno and distressed it. Only thing left is to work on the light fixture over the sink area and the mirror frame for the small medicine cabinet. My dream for that, is to actually make it as a picture frame and take out the mirror since it is pretty useless in that corner. It may never happen, but it's a thought.
Distressed Mirror 

I love the distressed look, as it hides a multitude of imperfections and gives some character to an otherwise bland bathroom.  Boys came home from church camp that Friday and were totally shocked, but Honey  loves it.  Says it looks so much bigger and fresh, so all is well!